Revamping eLitmus.com | Stand-Alone Front-end Module
The current elitmus.com is a web application built with Ruby on Rails Framework, and the views are sent directly from the backend server whenever requested. This was quite good before, but in present scenario of internet and web technologies, these seem to lack some very basic requirements. And Hence, an upgradation is required.
Formally, current elitmus.com has a monolithic structure i.e. the front-end and the back-end are tightly coupled together. As a result of this, it is not possible to divide the project’s logic and team for front-end and back-end. Only Full Stack Developers having knowledge of both the domains are required in order to work in this project. This somehow limits the people who are more expertised in one of the domains.
Also, the present elitmus.com is not using the latest web technologies available. This greatly impacts the user experience.
So, What’s the solution for this ?
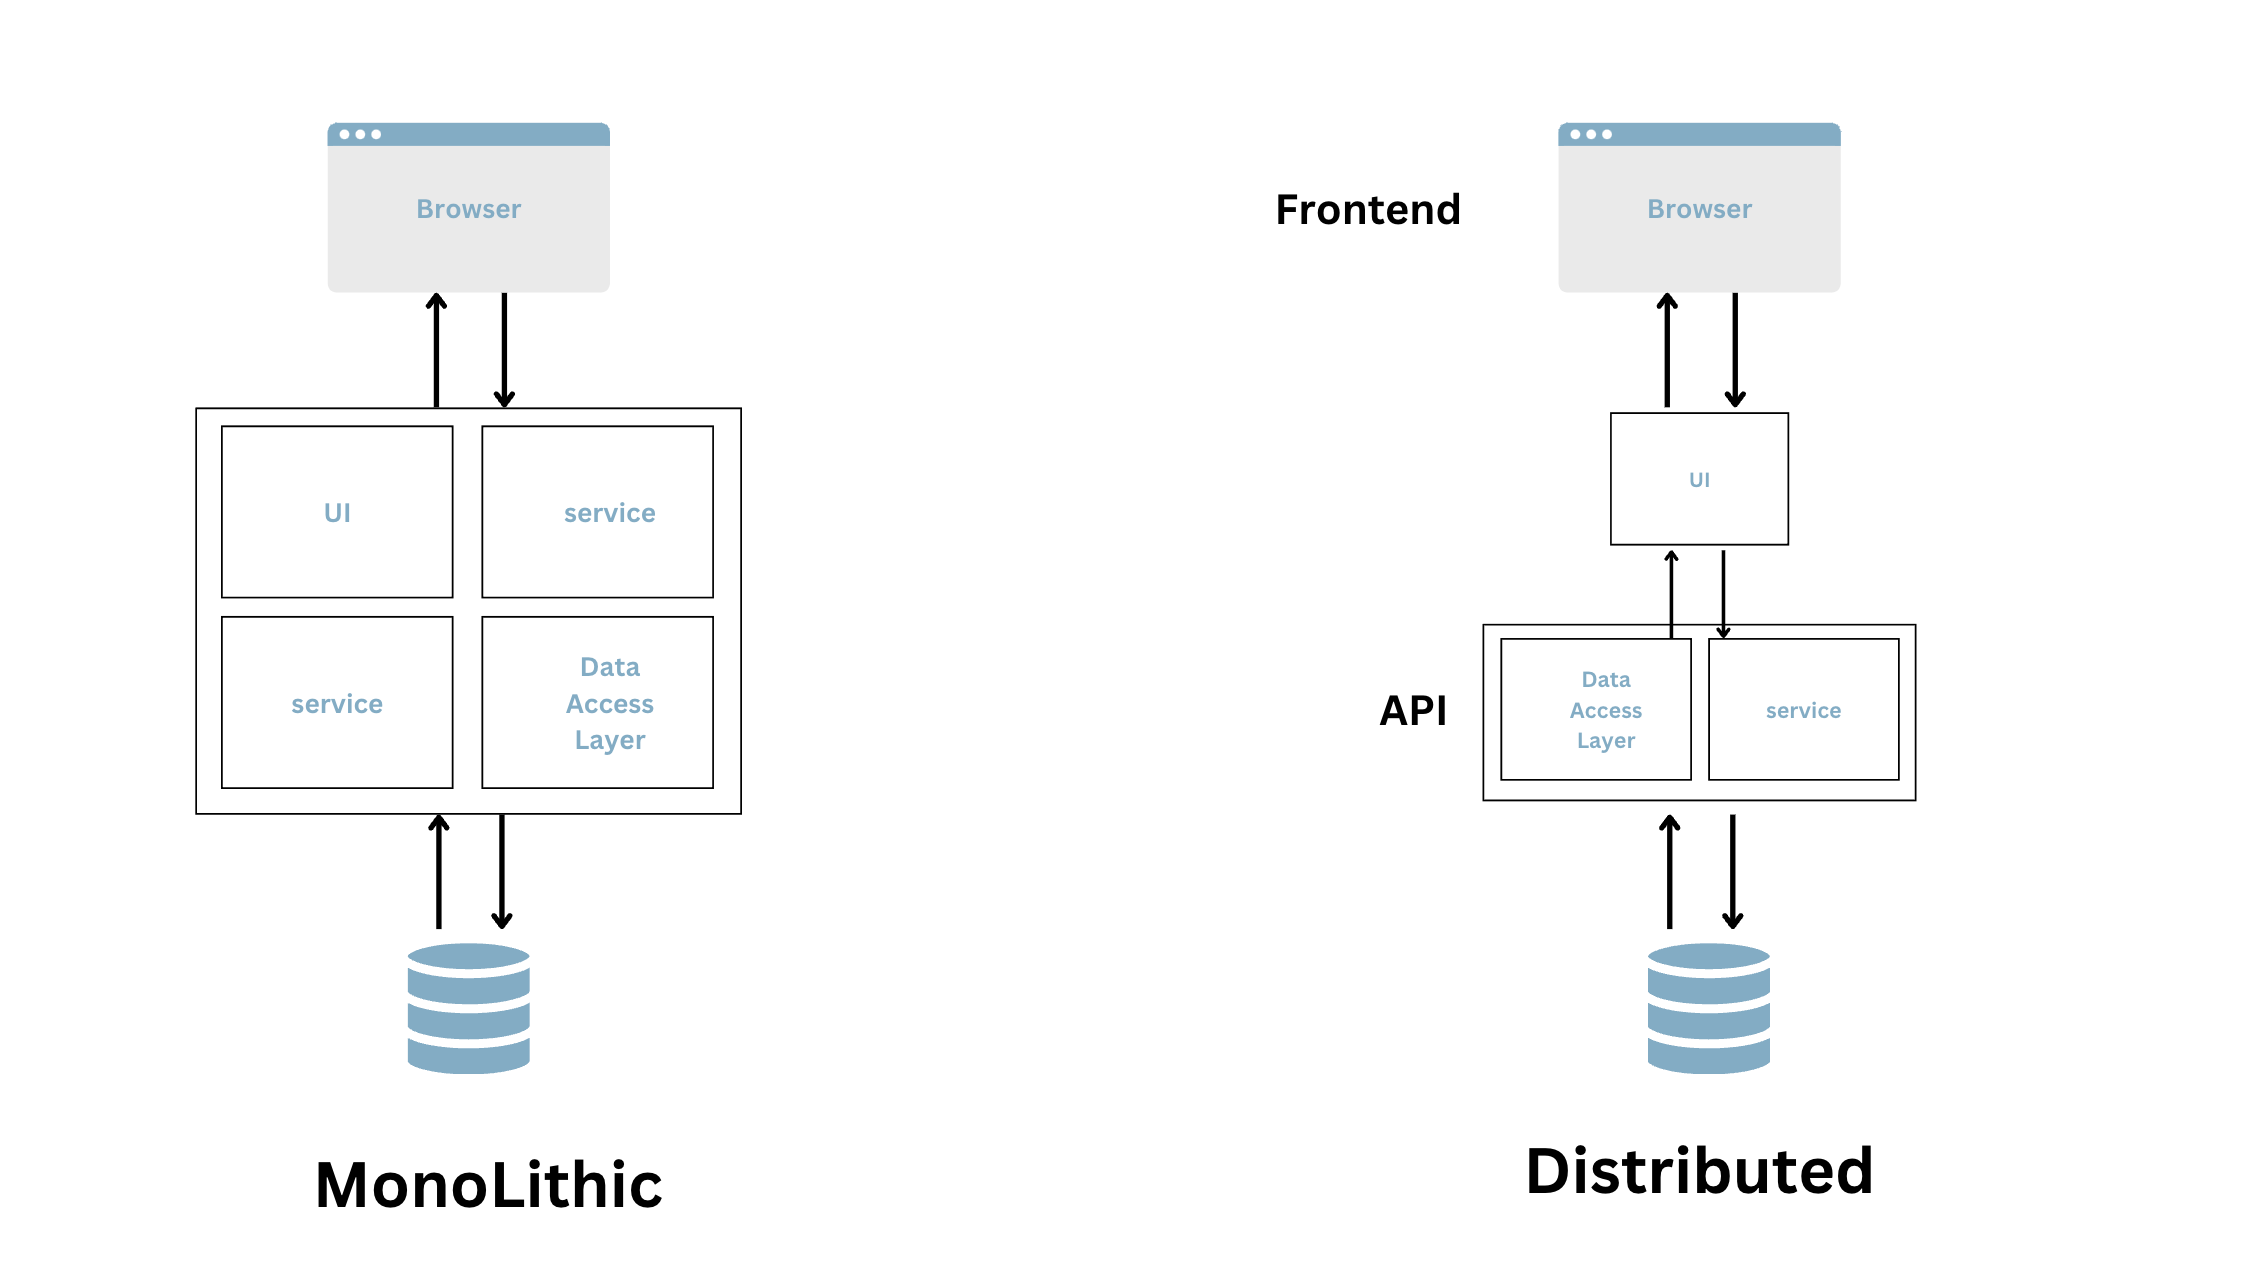
Well, we can separate the front-end and back-end. This will solve all the problems faced by the developers who work or tends to work in this project. This solves some of the major issues faced today by developers.
Now, we can have a distributed system, with the views ( front-end ) in one place and the Models and Controllers in the other. The Front-end we plan to build can be built using the latest and efficient web technologies currently available. This helps to improve the User Experience as well.
What Benefits ?
- Developer Experience
- Team Separation → We can have Dedicated teams for front-end and back-end, each expertised in their own domains
- Logic Separation → We can separate the Logic of course for the frontend and backend
- Easy to Manage
- Easy to Scale
- User Experience
- Latest Web Tech like React can be used to Build Views
- Improved Speed
- Improved Performance
- Consistency in design
How do we do it?
Well, now that we know what we have to do. We are halfway there already ( Just Kidding ). Let’s discuss some of the things we can use to make the front-end efficient and reliable.
- React JS
- Its component architecture , helps us building a consistent design across the site.
- It’s fast and performant.
- Tailwind CSS
- This is a light-weight CSS framework which is highly reliable and easy to use.
- This has a good community, which can help to borrow UI components rather than making it from scratch.
- Redux Toolkit
- Redux Toolkit is a light version of Redux, which extracts away a lot of boilerplate codes and provides us easy to use APIs to manage state.
- Jest
- Jest is the most popular library for writing tests in a react application. Infact, Create-React-App provides support for this out of the box when we initiate a new react project.
So, that’s all the core technologies we can use to build an efficient and reliable front-end. But, here is the catch: we can even improve more by following certain practices, which will be fruitful in the long run.
What else can we Improve ?
Following are some of the best practices that we can use to further improve the frontend application.
- ES Lint
- Enforcing a code style guide is important to maintain the source code of the application. It helps to maintain consistency across the application.
- More Particularly, we can use the AirBNB Style Guide. This is the most popular style guide for React Application.
- We can add rules as per our need and requirements in the .eslintrc.js
- Nested Routes
- This is one of the features of react. We can nest the routes under other routes to maintain a route intuition.
  <Route path="/jobs" element={<JobsAndInterviews />}>
    <Route index element={<AllJobs />} />
    <Route path="my_jobs" element={<MyJobs />}>
      <Route index element={<ActiveJobs />} />
      <Route path="active" element={<ActiveJobs />} />
      <Route path="inactive" element={<InActiveJobs />} />
      <Route path="interviews" element={<Interviews />} />
    </Route>
    <Route path="all_jobs" element={<AllJobs />} />
  </Route>
Like in this example snippet, we have a parent route for job and under that my_jobs and inside that we have active, inactive, interviews.
-
/jobs/my_jobs/active → this route path is really gives a lot of information of the pages.
-
Dynamic Routes
- This is another feature of React Itself. This allows us to only load the pages that are requested by the user and not all.
- Just imagine, our site has hundreds of pages. When the user wants to visit the homepage, we are trying to send him all the hundred pages. This doesn’t make any sense right ?
  // Jobs Page Routes
  export const JobsAndInterviews = lazy(() => import('../pages/Jobs'));
  export const AllJobs = lazy(() => import('../pages/Jobs/AllJobs'));
  export const ApplyJob = lazy(() => import('../pages/Jobs/ApplyJob'));
  export const JobDetails = lazy(() => import('../pages/Jobs/JobDetails'));
  export const MyJobs = lazy(() => import('../pages/Jobs/MyJobs'));
  export const ActiveJobs = lazy(() => import('../pages/Jobs/MyJobs/Active'));
  export const InActiveJobs = lazy(() => import('../pages/Jobs/MyJobs/Inactive'));
  export const Interviews = lazy(() => import('../pages/Jobs/MyJobs/Interviews'));
This above snippet shows how to import the components dynamically. But for this thing to work, we need to wrap the Routes in a Suspense Component which takes fallback. The component given inside the fallback is rendered in between the dynamic loads. So, we can put our page loader here. Below is the snippet showing how to do it.
  import jobsRoutes from './routes/jobsRoutes';
  const App = () => (
  <Router>
    <Provider store={store}>
      <Layout>
        <Suspense fallback={() => <Loader />}>
          <Routes>
            {jobsRoutes}
          </Routes>
        </Suspense>
      </Layout>
    </Provider>
  </Router>
  );
Now, this makes the website immensely faster than before.
- Intuitive File and Folder Organization -> Organizing the files and folders properly is a very important task because it significantly helps the new developers. It lowers the learning curve for the new fellas.
  /src
    /__tests__
      /categoryA
        /page1.test.js
        /page2.test.js
      /categoryB
        /page1.test.js
        /page2.test.js
    /assets
    /components
      /customElements
      /Layout
    /features
      /redux_slices.js
    /pages
      /categoryA
        /page1.jsx
        /page2.jsx
      /categoryB
        /page1.jsx
        /page2.jsx
    /routes
    /store
      /redux_store.js
    /styles
That’s how we can improve our codebase even more.
Then, we have to make sure if our application runs the same on every device, OS, and system specs. For that we can dockerize the react app.
Dockerization and Deployment
Dockerizing the react app gives us the following benefits:
- Consistency: Docker ensures the app runs consistently across different environments.
- Dependency Management: Docker encapsulates app dependencies, preventing conflicts.
- Easy Deployment: Docker simplifies deployment to various environments.
- Scalability: Docker facilitates easy scaling to handle increased traffic.
- Versioning and Rollbacks: Docker images can be versioned, enabling controlled updates and rollbacks.
- Development and Testing: Docker streamlines development and testing in a consistent environment.
- Infrastructure Agnostic: Docker allows running the app on various infrastructures.
- Resource Efficiency: Docker containers are lightweight and efficient in resource utilization.
- Easy Collaboration: Docker promotes seamless collaboration among developers and teams.
- Security: Docker provides isolation, adding an extra layer of security to the app.
We can dockerize the react app by adding docker files i.e.
- Dockerfile → contains environment and installation instructions for the app.
  FROM node:18 as builder
  WORKDIR /app
  COPY package.json .
  RUN npm install
  COPY . .
  RUN npm run build
  FROM nginx
  EXPOSE 80
COPY --from=builder /app/build /usr/share/nginx/html- docker-compose.yml → contain commands to run our docker container.
  version: '3'
  services:
    web:
      build:
        context: .
        dockerfile: Dockerfile
      ports:
        - '80:80'
Now, we have successfully containerized our react application. Finally, we need to deploy it to some cloud services such as AWS.
- We can first push our docker image to docker hub
docker push iamsmruti/elitmus-frontend- Then we can login to EC2 instance and then pull the docker image
docker pull iamsmruti/elitmus-frontend- Finally, we can run the docker image
docker run -d -p 5000:5000 iamsmruti/elitmus-frontendThat wraps up our frontend application which can now be live. It is fully capable of consuming the APIs from the backend. Now, the business logic is in the backend and doesn’t put much load on the frontend and hence it is performant and reliable.
If you have any questions, doubts, you can ping me at smrutiranjanbadatya2@gmail.com.
I would definitely get back to you.
I Hope this was a helpful and insightful guide for making a better frontend application with all the necessary good practices to maintain sustainability of the project.
See Ya 👋🏻 … Peace ✌🏻
References