Demystifying Rails 7 System Tests: Configuring CI Pipeline
In Rails 5.1 and later versions, system tests were introduced as a new type of test to simulate a user interacting with a web application. These tests use a headless browser, typically powered by Capybara and a WebDriver, to mimic a user’s actions like clicking buttons, filling forms, and navigating through the application.
Why do we need System Tests?
- System tests let you test applications in the browser. Because system tests use a real browser experience, you can test all of your JavaScript easily from your test suite.
- Typically used for:
- Acceptance testing: verify that the app has implemented a specific feature
- Smoke testing: verify that the app is functional on a fundamental level and doesn't have code issues.
- Characterization testing: is a type of software testing that involves examining and documenting the behavior of an existing system or application without making any modifications to its code
How we can run System Test?
- System Test interacts with your app via an actual browser to run them.
- From a technical perspective, system tests aren’t necessarily required to interact with a real browser; they can be set up to utilize the rack test backend, which emulates HTTP requests and processes the HTML responses. While system tests based on rack_test run faster and more dependable than front-end tests involving an actual browser, they have notable limitations in mimicking a genuine user experience as they are incapable of executing JavaScript.
The Anatomy of a System Test?

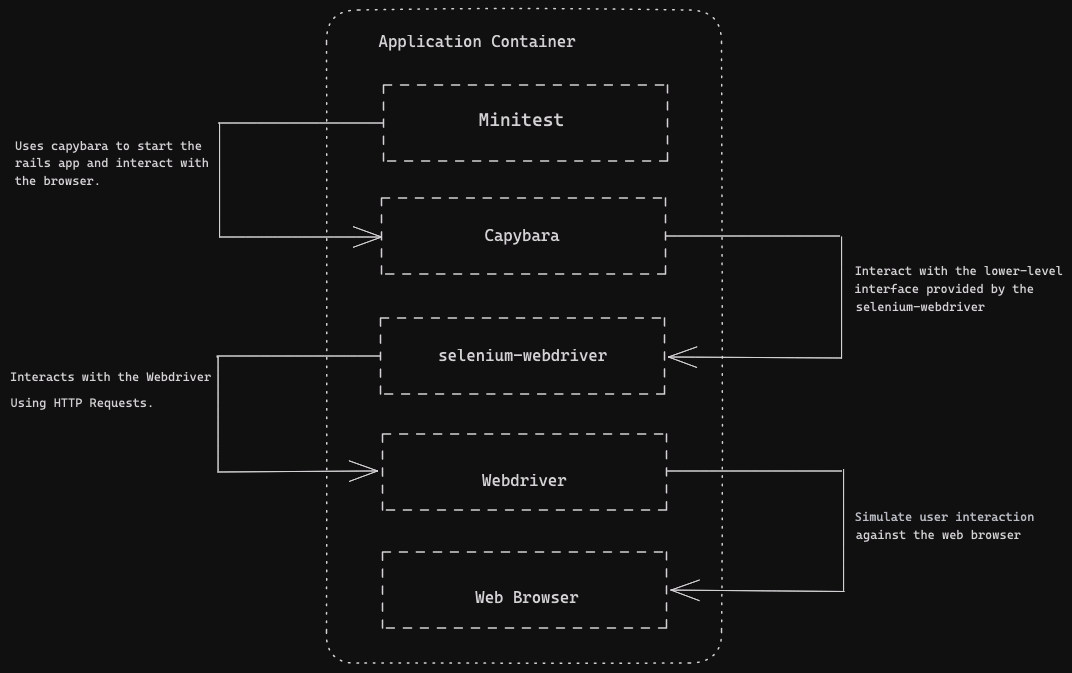
- Minitest
- Minitest is a small and incredibly fast unit testing framework.
- It provides the base classes for test cases. For Rails System Tests, Rails provides an ApplicationSystemTestCase base class which is in turn based on ActionDispatch::SystemTestCase:
require "test_helper"

  class ApplicationSystemTestCase < ActionDispatch::SystemTestCase
    driven_by :selenium, using: :chrome, screen_size: [1400, 1400]
end- In
ActionDispatch::SystemTestCasewe require thecapybara/minitestlibrary. - It provides basics assertions like assert_equal, assert_nil, assert_same, assert_raises, assert_includes.
- A runner to run the tests and report on their success and failure.
-
Capybara
- Capybara starts your app in a separate process before running the tests. This ensures that the tests are run against the correct version of your app.
- Capybara provides a high-level API that makes it easy to write tests in a natural way. For example, you can write a test that says
"click the button"instead of having to write code to find the button and click it. - Here is an example of a test written with Capybara's DSL (Domain Specific Language):
visit('/login')
  fill_in('email', with: 'user@example.com')
  fill_in('password', with: 'password')
click_button('Login')-
Selenium-Webdriver
- Capybara uses the Selenium Webdriver library to interact with real browsers. Selenium WebDriver is a cross-platform library that provides a way to control web browsers from code. Capybara uses Selenium WebDriver to translate its high-level DSL (Domain Specific Language) into low-level commands that the browser can understand.
require "selenium-webdriver"

  driver = Selenium::WebDriver.for :firefox
  driver.navigate.to "http://google.com"

  element = driver.find_element(name: 'q')
  element.send_keys "Hello WebDriver!"
  element.submit

  puts driver.title

Driver.quit- You can see how it’s a bit lower-level than the Capybara example further up. The selenium-webdriver library translates these calls into WebDriver Protocol, which it speaks to a webdriver executable.
-
Webdriver Protocol
- The Selenium WebDriver library translates its calls into the WebDriver Protocol. The WebDriver Protocol is a HTTP-based wire protocol that is used to communicate between the Selenium WebDriver library and the web browser.
- In order to start a chrome browser window and navigate to google.com. We need to startup geckodriver.
- We send it a “new session” command with a HTTP post request
curl -X POST 'http://127.0.0.1:9515/session' -d '{"capabilities":{"firstMatch":[{"browserName":"firefox"}]}}'- This return a session id along with data
{ ... "sessionId":"f1776ba558e28309299dc5f62864e977" ... }- Then we make another post request with a session id. And url in data parameters
curl -X POST 'http://127.0.0.1:9515/session/f1776ba558e28309299dc5f62864e977/url' -d '{"url": "https://google.com"}'- Webdriver
- Webdriver is a tool that speaks “Webdriver protocol” and controls the browser.
- Every major browser there is an associated webdriver tool. Chrome has chromedriver. Firefox has a geckodriver. MS Edge has edgedriver. Safari has safaridriver.
- WebDriver tools act as servers: when you execute them, they start a persistent process that listens for HTTP requests until it is terminated.
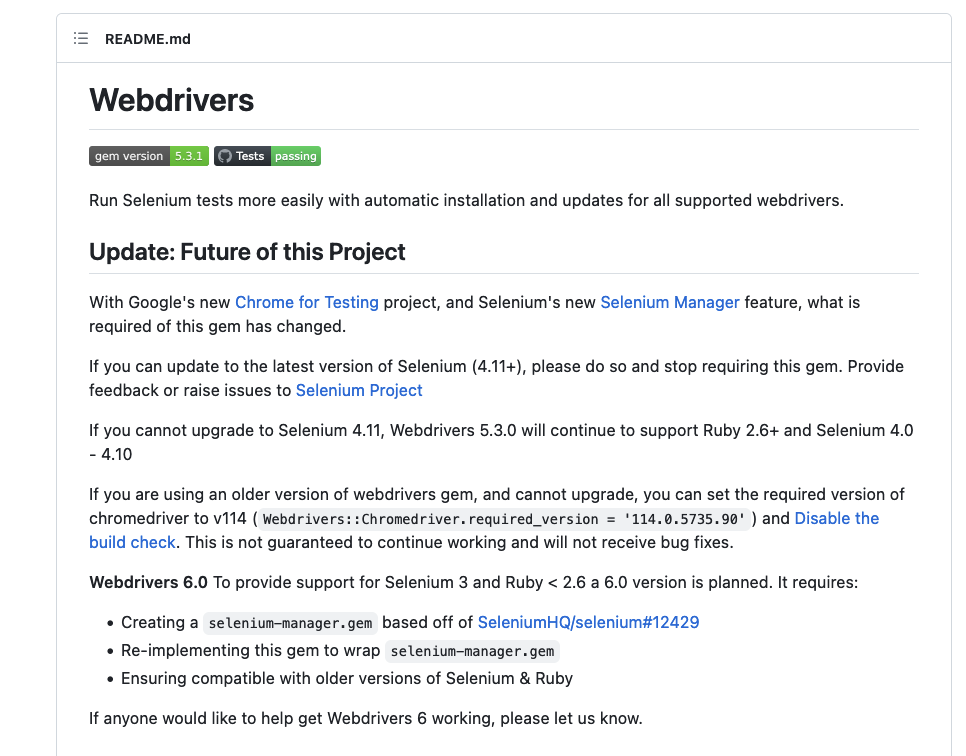
- Webdrivers gem
- Before selenium-webdriver 4.11, webdrivers gem automatically determines which WebDriver executable needs to be downloaded for your platform and selected browser, downloads it, and arranges for that executable to be used by selenium-webdriver.
- From version 4.11, they have incorporated the functionality in selenium-webdriver gem using selenium-manager.

Running Rails 7 System Tests with Docker and Gitlab Runner on Arm64 and Amd64 linux machines
Step 1: Prepare the Rails 7 application for testing
- Run the command below to generate a very basic Ruby on Rails 7 app:
rails new minitest-rails-app- Go ahead and open up the project in your favourite editor and proceed to the Gemfile, specifically to the test block:
group :test do
    # Use system testing [https://guides.rubyonrails.org/testing.html#system-testing]
    gem "capybara"
    gem "selenium-webdriver"
    gem "webdrivers"
end- Next, let’s do a quick scaffold generation to have something to work with:
rails generate scaffold Blog title:string body:text- Usually, generating a scaffold will automatically generate the
application_system_test_case.rband everything you need for the system tests
application_system_test_case.rb (default)

  require "test_helper"

  class ApplicationSystemTestCase < ActionDispatch::SystemTestCase
    driven_by :selenium, using: :chrome, screen_size: [1400, 1400]
end- Run the database commands
rails db:setup
rails db:migrate- Running a Basic System For the First Time
rails test:systemStep 2: Exclude the gem webdrivers from the list of dependencies
- Before selenium-webdriver 4.11, webdrivers gem automatically download webdriver executable.
- From version 4.11, they have incorporated the functionality in selenium-webdriver gem using selenium-manager.
- We can comment out the webdrivers line from Gemfile.
- After change,
Gemfilelooks like this
group :test do
  # Use system testing [https://guides.rubyonrails.org/testing.html#system-testing]
  gem "capybara"
  gem "selenium-webdriver", "~> 4.11"
  #gem "webdrivers"
  end
Step 3: Point the Selenium-webdriver to use the firefox browser
- As chrome has not released binary compatible with
linux/arm64machine. So the test failed on the arm64 linux machine. I tried multiple approaches to make it work with headless_chrome, but didn’t work and commend the issue in details in this issue tracker - We need to change the browser to the firefox.
#application_system_test_case.rb (change driver to Firefox)

  require "test_helper"

  class ApplicationSystemTestCase < ActionDispatch::SystemTestCase
    driven_by :selenium, using: :firefox, screen_size: [1400, 1400]
  end
Step 4: Prepare the docker image
- Create
Dockerfile
FROM ruby:3.1.2-slim-buster

  RUN apt-get update
  RUN apt-get -y install gnupg curl wget xvfb unzip

  ENV NODE_VERSION 19

  RUN curl -fsSL https://deb.nodesource.com/setup_${NODE_VERSION}.x | bash -  && \
  apt-get install --yes nodejs && \
  apt-get install --yes libxss1 libappindicator1 libindicator7 python2

  RUN apt-get update && \
  apt-get install --yes software-properties-common build-essential libssl-dev sqlite3 libsqlite3-dev pkg-config ca-certificates firefox-esr

  RUN apt-get install -y git-all
  RUN npm install yarn -g
ADD . /data-
This Dockerfile sets up an image with Ruby 3.1.2 and Node.js 19 installed. It installs system dependencies like Git, Yarn, various libraries for sqlite and Firefox.
-
Build Docker image
docker buildx build -t dockermanishelitmus/systemtest-rails-app:latest1.0 . --platform linux/amd64,linux/arm64 --push- Command is building a Docker image using the buildx extension, targeting two different platforms (Intel/AMD 64-bit and ARM 64-bit), tagging the image as latest1.0, and pushing the resulting image to a container registry.
Step 5: Prepare the gitlab-runner
- In the project root directory create a file
.gitlab-ci.ymlwith content
image: "dockermanishelitmus/systemtest-rails-app:latest1.0"
services:
 - redis:latest
variables:
 RAILS_ENV: "test"

cache:
 paths:
   - vendor/ruby
   - node_modules/

before_script:
 - gem install bundler  --no-document
 - bundle config set force_ruby_platform true
 - bundle install
 - bin/rake db:drop
 - bin/rake db:setup
 - bin/rake db:migrate

stages:
 - tests

SystemTests:
 stage: tests
 script:
   - yarn install
   - bin/rake assets:precompile
   - bin/rails test:system
 artifacts:
   when: on_failure
   name: "$CI_JOB_NAME-$CI_COMMIT_REF_NAME"
   paths:
     - coverage/
expire_in: 1 day- Finally run your test suite
gitlab-runner exec docker SystemTests- Output
$ bin/rails test:system
  Running 4 tests in a single process (parallelization threshold is 50)
  Run options: --seed 13031

  # Running:

  Capybara starting Puma...
  * Version 5.6.7 , codename: Birdie's Version
  * Min threads: 0, max threads: 4
  * Listening on http://127.0.0.1:33385
  ....

  Finished in 7.865541s, 0.5085 runs/s, 0.5085 assertions/s.
  4 runs, 4 assertions, 0 failures, 0 errors, 0 skips
  Saving cache for successful job
  Creating cache SystemTests/main...
  WARNING: vendor/ruby: no matching files. Ensure that the artifact path is relative to the working directory
  node_modules/: found 2 matching files and directories
  No URL provided, cache will not be uploaded to shared cache server. Cache will be stored only locally.
  Created cache
  Job succeeded
Conclusion
Now we have a setup that enables us to run system tests in both arm64 and amd64 linux machines with minimal customizations we may want to add. A few tips and tricks should help to get your first system tests up and running in CI pipeline.
