Mastering Multi Tenant setup with rails part 1
Multi-tenancy is a software design where a single instance of a software application serves multiple customers or tenants (individual users or organizations). In a multi-tenant architecture, each tenant’s data and configuration are logically isolated from one another, providing a sense of individuality and privacy while sharing the same underlying infrastructure, codebase, and application instance.
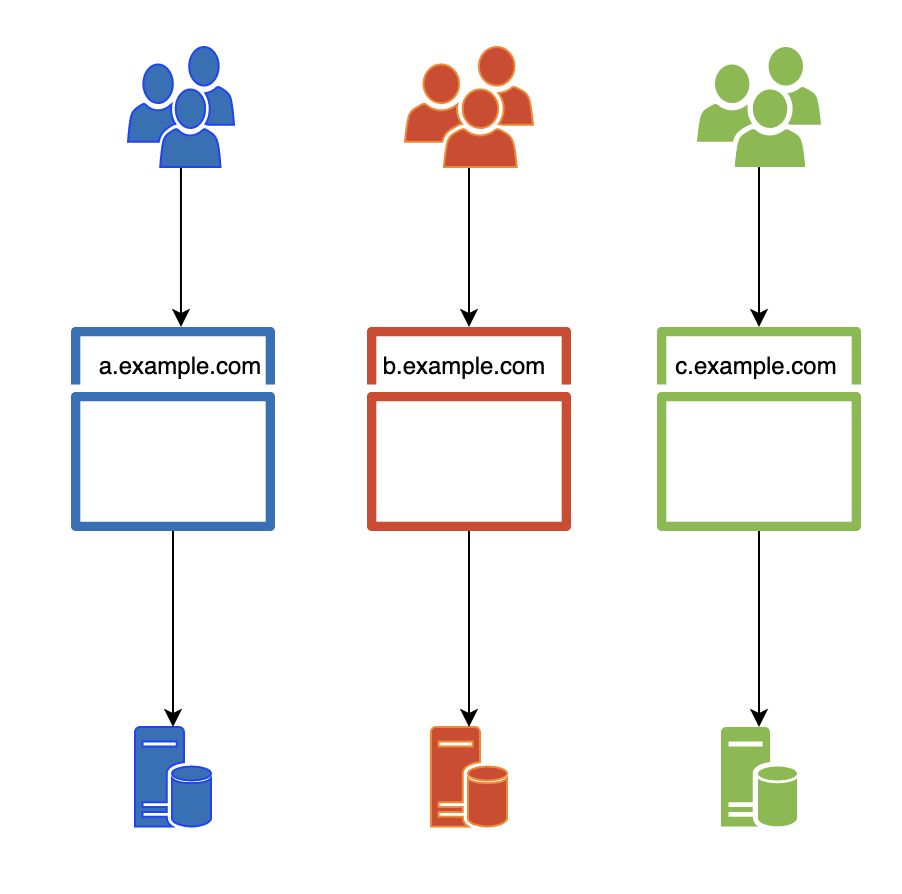
Single Tenant application
In a single-tenant application, each hosted instance has its dedicated database. Upon addition of a new organization that requires segregated data, a new application is hosted with a different database.
Multi Tenant Application types
- Single Database shared rows
- Each table in database will contain an additional row known as tenant_id.
- Whenever data is stored and retrieved from table this coloumn will be used to get/store the data.
-
Only the data that belongs to a specific customer/tenant will be fetched.

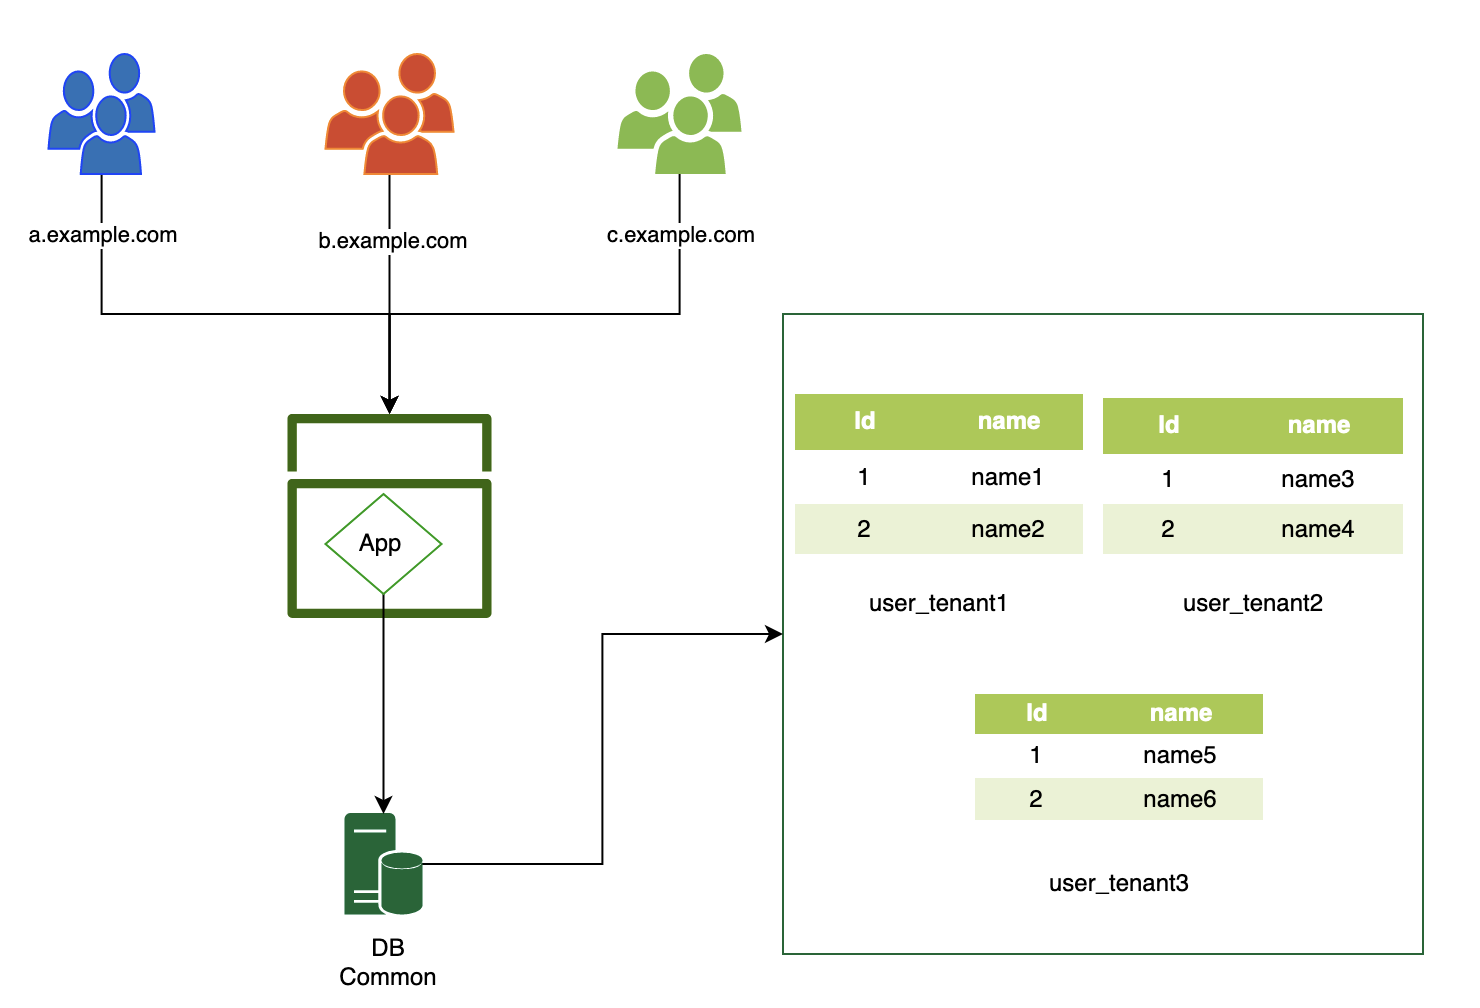
- Single Database shared schema
- For each tenant a different table will be maintained in same database.
-
Data will be segregated table wise.
- Dedicated Database for Each Tenant
-
For each tenant a new database schema will be maintained, it can be termed as shard.
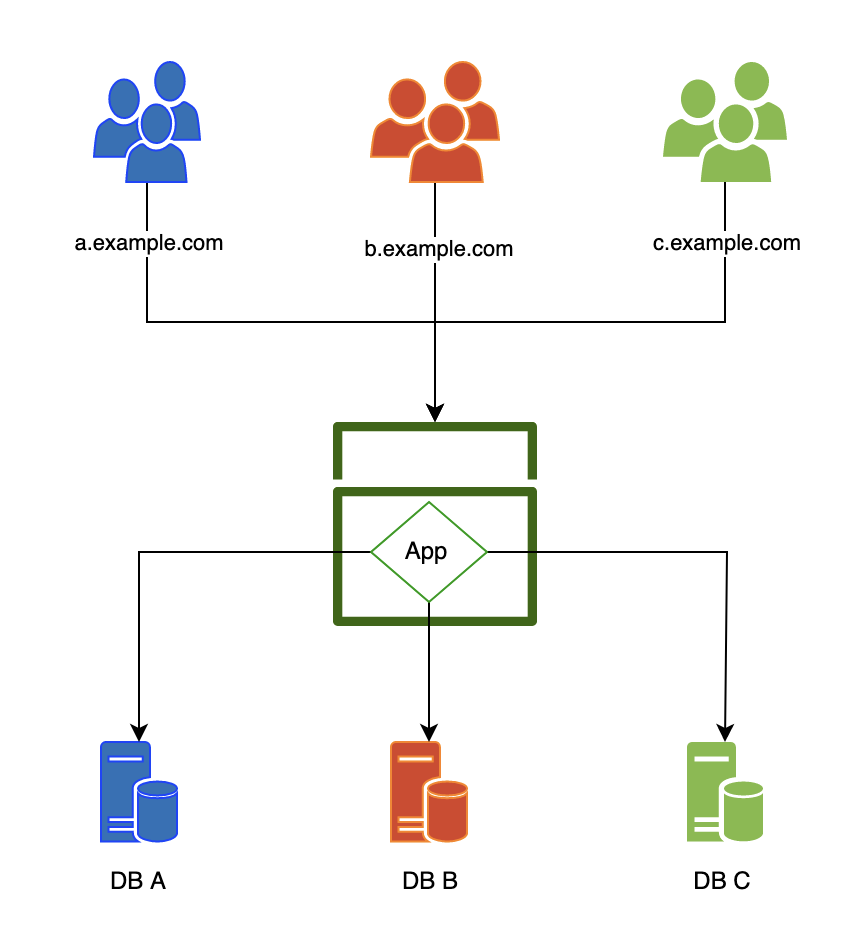
-
In this blog post, we’ll take an in-depth look at the third approach, where we opt to manage separate databases for each tenant. To demonstrate this, we’ll walk through the process of creating a basic Rails blog application from the ground up.
Goal
- Setting up a multi-tenant application in development mode.
- dynamically switching databases according to the requesting host name.
What features rails 6 brings in
Rails 6 introduced the multiple database setup with following features -
- Multiple writer databases and a replica for each.
- Automatic connection switching for the model you’re working with.
- Automatic swapping between the writer and replica depending on the HTTP verb and recent writes.
- Rails tasks for creating, dropping, migrating, and interacting with the multiple databases.
Setup
Create new rails app
rails new multi_db_blog- update gemfile to use mysql2 instead of sqlite3
Setup databases
- In
database.ymlfile update the database with name.
development:
  app1:
    adapter: mysql2
    encoding: utf8
    reconnect: false
    database: app1_development
    pool: 5
    username:
    password:
    socket: /tmp/mysql.sock
    host: 127.0.0.1
  app2:
    adapter: mysql2
    encoding: utf8
    reconnect: false
    database: app2_development
    pool: 5
    username:
    password:
    socket: /tmp/mysql.sock
    host: 127.0.0.1
bin/rake db:createcreate databases for both the tenants.- You have the option to execute specific rake commands for each database. For instance, you can create the
app1database using the command:bin/rake db:create:app1
Generate Models and Controller
-
Model
bin/rails generate model Article title:string body:text -
Run migrations
bin/rake db:migrate -
Controller
bin/rails generate controller Articles index --skip-routes -
update
routes.rbfile.
root "articles#index"
resources :articles
Complete the Articles Controller, Model and respective views by following This Guide
Start App
- Run
bin/rails sto start the server. - By default rails will connect to db1 now.
- This will act as a default database for the current application.
Running up both databases simaltaneously
Install nginx & paste the following code in nginx.conf file.
http {
  server {
   listen 3000;
   server_name localhost;

   location / {
        proxy_pass http://127.0.0.1:3000; # Rails app running on port 3000
        proxy_set_header Host $host:$server_port;
        proxy_set_header X-Real-IP $remote_addr;
        proxy_set_header X-Forwarded-For $proxy_add_x_forwarded_for;
    }
  }

  server {
    listen 4000;
    server_name localhost; # Change this to your actual domain if needed

    location / {
        proxy_pass http://127.0.0.1:3000; # Rails app running on port 3000
        proxy_set_header Host $host:$server_port;
        proxy_set_header X-Real-IP $remote_addr;
        proxy_set_header X-Forwarded-For $proxy_add_x_forwarded_for;
    }
  }
}
events { }
Above nginx configurations listens to port 3000 and 4000 and redirect to rails application running in port 3000.
Additional Rails changes
Since We are using Rails 7 we can use automatic shard swap feature provided by rails. if using rails 6.1 or 6, a middleware can be introduced to automatic switch the tenants depending on request. Visit next section for the details.
Mention list of tenants in a .yml file. You can maintain these records in a separate database as well, for now I will create a settings.yml file.
development:
  tenants:
    app1:
      hosts:
        - localhost:3000
    app2:
      hosts:
        - localhost:4000
update application.rb with following configurations.
Rails.application.configure do
  config.active_record.shard_selector = { lock: true }

  tenants = Rails.application.config_for(:settings)[:tenants]  # maintaining list of tenants with host
  config.active_record.shard_resolver = ->(request) {
    tenants.keys.find { |key| tenants[key][:hosts].include?(request.env['HTTP_HOST']) } || :app1
  }
end
update application_record.rb
   # connects_to shards: {
   #  app1: { writing: :app1 },
   #  app2: { writing: :app2 }
   # }
   # OR

  TENANTS = Rails.application.config_for(:settings)[:tenants]
  connects_to TENANTS.keys.map { |shard| [shard, { writing: shard }] }.to_h
Creating Middleware for automatic shard switching(ignore if using rails 7 or above)
- Create a middleware named
middleware/tenant_selector.rb - Add following code
  module Middleware
    class TenantSelector
      def initialize(app, tenants)
        @app = app
        @tenants = tenants
      end

      attr_reader :tenants

      def call(env)
        request = ActionDispatch::Request.new(env)
        tenant = selected_tenant(request)

        set_tenant(tenant) do
          @app.call(env)
        end
      end

      private
      def selected_tenant(request)
        tenants.keys.find { |key| tenants[key][:hosts].include?(request.env['HTTP_HOST']) } || :app1
      end

      def set_tenant(tenant, &block)
        ActiveRecord::Base.connected_to(shard: tenant.to_sym, role: :writing) do
          yield
        end
      end
    end
  end
- Update
application.rbfile with following changes.
    tenants = Rails.application.config_for(:settings)[:tenants]
    config.app_middleware.use Middleware::TenantSelector, tenants
Final Steps
Follow these final steps to confirm your multi-tenant Rails application is up and running smoothly:
- Run
bin/rails s - Access localhost:3000 to connect to db1
- Access localhost:4000 to connect to db2
- If you wish to add more databases, simply update the
database.ymlandsettings.ymlfiles
What Next?
In the upcoming series of blog posts, we will delve into the following topics:
- Maintaining Background Jobs.
- Running Rake Tasks with Cron Jobs for Multiple Databases.
- ActiveStorage Data Management with Different Storage Types for Each Tenant.
- Caching.
Summary
In this blog post we covered creating a multi tenant application from scratch and setting it up in development environment. We were able to automatically switch databases according to type of database.
References